


How Hard Should You Tamp Espresso for Perfect Extraction
|
|
Time to read 7 min
Your Cart
Your cart
Favorites


Shop by Brands

Shop by Brands
Shop by Brands
Shop by Brands


Shop by Brands
Shop by Brands

|
|
Time to read 7 min
If you've ever wondered how hard you should tamp espresso, the answer might explain why your shots taste inconsistent. When tamping pressure is off, the problem isn’t usually your grind or beans but the way water moves through the puck.
Tamping is a small step with a big impact. Too light and water channels through loosely packed grounds, producing a weak, uneven shot. Too hard and you restrict flow, risking over-extraction and harsh flavors.
The goal is simple: controlled, repeatable pressure. Whether you use a manual or calibrated tamper, dialing in your technique can transform your espresso quality.
In this guide, we’ll break down what proper tamping pressure looks like, how to test your technique, and which tools can help you achieve café-level results every time.
At a glance:
Even tamping creates uniform resistance and reduces channeling.
Ideal pressure is about 25–30 pounds, with consistency more important than force.
Level tamping and proper ground distribution matter more than tamp strength.
Common mistakes include over-tamping, double-tamping, and skipping distribution.
Calibrated or automatic tampers provide repeatable, professional results.
Tamping is the simple but crucial step of compressing your ground coffee evenly into the portafilter before brewing. Its purpose is to create a uniform, compact coffee bed that provides consistent resistance to the pressurized water during extraction.
When done correctly, tamping ensures that water flows evenly through every part of the puck, dissolving the right balance of oils, acids, and sugars. The result is a smooth, balanced espresso with full-bodied flavor and rich crema.
But when tamping is uneven or inconsistent, things go wrong quickly.
Water finds the path of least resistance, creating channels where it rushes through loosely packed areas and over-extracts others. This leads to bitter, sour, or weak shots that lack clarity and texture.
A well-packed, level coffee bed slows down the extraction just enough to let flavor develop evenly across the puck. Without that uniform resistance, even the best beans or machine cannot produce a consistent espresso.
With the basics of tamping in place, the next question is how much pressure you actually need to get a consistent espresso shot.
Tamping might look simple, but it’s one of the most misunderstood steps in espresso preparation. The way you press the grounds affects how water moves through the puck and ultimately how your espresso tastes.
Let’s break down how much pressure you actually need, and how to get it right every single time.
Ideal Pressure Range: Aim for 25–30 pounds of pressure. This is enough to compact the grounds evenly without over-compressing them.
Focus on Consistency: Uniform tamping matters more than exact force. Uneven pressure leads to weak spots in the puck and causes channeling — where water flows too quickly through one area.
Adjust for Grind Size: Finer grinds need lighter pressure, since they already resist water flow. Coarser grinds need firmer tamping to create proper resistance.
Maintain Even Density: Keep the coffee bed level and stable. A crooked or uneven tamp can ruin extraction even if your pressure is perfect.
Practice with a Scale: Use a bathroom scale to develop muscle memory. Tamp until it reads 25–30 lbs of pressure and repeat until you can do it naturally.
Upgrade Your Tools: A flat, ergonomic tamper helps maintain even pressure and alignment.
Getting the pressure right is only part of the process. Now it’s time to focus on the technique that turns good tamping into consistently great espresso.
Suggested read: The Ultimate Guide to Automatic Tamper Espresso 2025
Tamping requires control, consistency, and balance. The goal is to create an even, compacted puck that resists water just enough to extract flavor evenly across every particle.

Here’s how to refine your technique and improve your espresso consistency over time:
The best tamp starts before you press down. After dosing, tap the portafilter gently or use a distribution tool to level the surface. If coffee is unevenly packed, water will find the weakest path and over- or under-extract certain areas, creating sour or bitter notes.
Alignment matters more than force. Keep your wrist, elbow, and shoulder stacked directly above the portafilter to apply vertical pressure. Tilting even slightly can create a slanted puck, leading to uneven water flow and inconsistent crema.
Once your coffee bed is level, press straight down with a single, deliberate motion. The exact force should match the pressure you practiced earlier. What matters most is repeatability so every shot sees the same resistance.
Twisting or tamping twice can disturb the puck and create cracks or density pockets. If desired, use a very light polish spin at the end, but it’s optional and does not affect flavor.
After tamping, check that the surface looks flat and the tamper hasn’t left any gaps along the sides. A tilted puck means your force wasn’t centered. Over time, aim to make every puck look and feel identical before brewing.
Strong tamping isn’t the goal. Consistent tamping is. Whether you prefer 20 or 30 pounds of pressure, staying consistent across shots is what improves flavor clarity. Many baristas use a calibrated tamper to train their muscle memory for even pressure every time.
Pro Tip: Invest in an auto tamper from Pro Coffee Gear to standardize your prep. Consistent tamping pressure helps reduce shot variability and brings out balanced sweetness and body in every extraction.
Even with solid technique, a few common missteps can throw off your extraction. Here’s what to watch for.
Even experienced baristas slip up when it comes to tamping technique. Small inconsistencies can throw off extraction, leading to sour, bitter, or watery shots.

Here are the most common tamping mistakes and how to fix them:
If your tamp isn’t level, water finds the path of least resistance, rushing through one side of the puck. This creates uneven extraction that produces harsh, unbalanced espresso.
Quick fix: Always level your portafilter on a flat surface before tamping. Press straight down and check the edges of the puck for even compression.
Pressing too hard compacts the coffee bed excessively, restricting water flow and risking bitter, over-extracted espresso. Beyond a certain point, more pressure doesn’t make better coffee.
Quick fix: Press firmly but stop once the puck feels fully compressed. Focus on even, repeatable pressure rather than force.
Tamping twice (or tapping the portafilter after tamping) disturbs the puck structure and can cause cracks or uneven density. This invites channeling and inconsistent flow.
Quick fix: Tamp once, firmly and evenly. If you need to adjust, re-distribute the grounds and start over instead of re-tamping.
If grounds aren’t evenly distributed before tamping, you’ll compress air pockets into the puck. This causes uneven water contact and unpredictable extraction.
Quick fix: Use a distribution tool or gently tap and shake the portafilter to level grounds before tamping. This step ensures the coffee bed is uniform and ready for consistent pressure.
Once the common pitfalls are clear, the next step is choosing tools that support consistent pressure and alignment.
Even with great technique, consistency depends on the tools you use. The right tamper can make your espresso prep easier and ensure every shot gets the same resistance and extraction quality.
Let’s look at the options that make that possible.
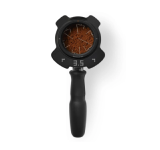
A traditional hand-held tamper with a flat stainless-steel base. Calibrated versions “click” at a preset pressure, usually around 30 lbs.
Why it helps: Gives you direct tactile control and helps build muscle memory. Calibrated models ensure you apply uniform pressure without guessing.
A tamper shaped for the palm rather than a handle, designed for ergonomic, level tamping with minimal wrist strain.
Why it helps: Promotes perfectly vertical pressure and consistent puck symmetry, reducing fatigue during repetitive use.
Motorized or spring-assisted tampers (like Puqpress) that apply a preset, uniform pressure automatically.
Why it helps: Removes human variability completely, speeds up workflow, and maintains identical pressure and alignment across hundreds of shots — essential for cafés and busy prosumer setups.
When every shot counts, consistency isn’t optional. The right tamping setup helps baristas work faster, waste less, and deliver the same taste cup after cup.
Suggested read: Best Espresso Tamper for Perfect Coffee
Great espresso begins with consistent puck preparation. A level, evenly compacted bed helps water flow predictably and produces balanced, reliable results.
Tamping works best when your technique stays steady from shot to shot. With the right tools, you can maintain uniform pressure and streamline your entire workflow.
If you want to improve your setup, explore professional tampers, auto-tampers, and espresso accessories from Pro Coffee Gear to support consistent, repeatable extractions.
If you're ready to upgrade your workflow, explore professional tampers, espresso machines, and workflow accessories from Pro Coffee Gear to keep every shot steady and repeatable.
Yes. Over-tamping restricts water flow and produces slow, bitter shots. Use steady pressure around 25–30 lbs and keep it consistent.
The puck should be firm and level, not overly compressed. A proper tamp removes air pockets while keeping the surface smooth and even.
If your shot runs in about 25–30 seconds with a steady flow, your tamp is likely correct. Fast or choking shots often point to tamp or grind issues.
It means your espresso yield should be about twice your dose. For example, 18 grams of coffee should produce around 36 grams of espresso in 25–30 seconds.
Our team can help you find the best fit based on your space, volume, and budget.
Talk to a Specialist

